### Introduction
Welcome to my guide for the [KGB Messenger CTF](https://github.com/tlamb96/kgb_messenger?tab=readme-ov-file&ref=maliciousmind.net). A big shout-out to Tyler for providing us with a super fun CTF experience — make sure to explore his work for some more content.
In this walk-through, we’ll focus on static analysis method. As we embark on our journey for the flags, we’ll look at ways of accomplishing the following and which tools we can use to do so:
1. Decoding an APK file (`apktool`)
2. De-compiling an APK to obtain the Java code (`d2j-dex2jar` & `JD-GUI`)
3. Re-building a dismantled APK (`apktool`)
4. Installing/Uninstalling APKs (`ADB`)
> [!info] CTF Description
> You are working for the International Secret Intelligence Service as a reverse engineer. This morning your team lead assigned you to inspect an Android application found on the phone of a misbehaving agent. It’s rumored that the misbehaving agent, Sterling Archer, has been in contact with some KGB spies. Your job is to reverse engineer the application to verify the rumour.
>
> The challenges should be solved sequentially. The flag format is FLAG{insert_flag_here}. Good luck!
There are three stages: Alerts, Login, and Social Engineering.
### Getting Started
While you can choose your preferred emulator, I’ve found Android Studio’s built-in emulator to be the easiest. In order to understand and analyse the behaviour the APK, we have to run it. If you’re using Android Studio, the Android Debug Bridge (`ADB`) should already be linked to the emulator.
```shell
adb devicees # check for available devices
adb install kgb-messenger.apk # install the challenge APK
```
You should now be able to see and run the application within your chosen emulator. Running KGB Messenger, we're met with the following message.
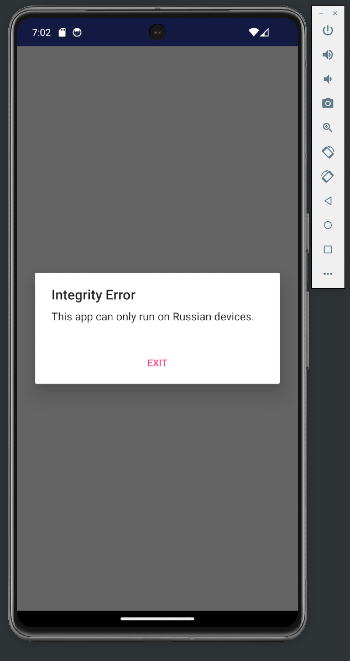
I don’t know about you, but I’m not Russian. Clicking `Exit` only closes the application so now we’ll reverse engineer to see if we can bypass that pop-up.
APKs are encoded, making them unreadable if simply unzipped. Therefore, we need to decode the APK so that we can read the `AndroidManifest.xml` file to identify what activity gets called first.
We can use `apktool` to obtain the decoded contents — pretty neat. There are several flag options to choose from, but for now we just need the `d` flag for decoding.
```shell
apktool d kgb-messenger.apk -o decoded-kgb
```
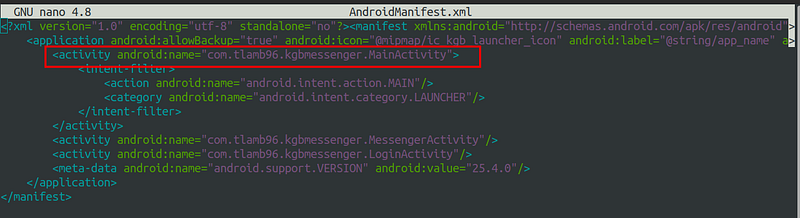
We’re now able to look for the `AndroidManifest.xml` which will give us an idea of where to begin. We can see that the first activity that runs is `MainActivity`.
We can also obtain a decompiled version of the APK, which allows us to view a high-level representation of the original project's code. In my case, this is the `java-kgb.jar` file which can be loaded into [JD-GUI](https://github.com/java-decompiler/jd-gui) for a more user-friendly interface.
```shell
d2j-dex2jar kgb-messenger.apk -o java-kgb.jar # decompile APK into Java code
jd-gui java-kgb.jar # load into JD-GUI
```
It's also possible to read the smali files that we obtained from `apktool`.

Smali can be considered an assembly language for Android applications. APK files include a `.dex` file, which contains Dalvik Bytecode—the code that is interpreted and executed when the application runs. Smali is a human-readable representation of this bytecode.
Now in JD-GUI, we can look at the `MainActivity` class.

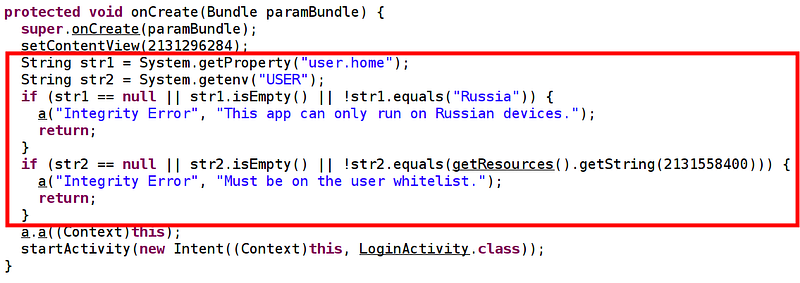
The method that we’re interested in is `onCreate`. In `onCreate`, we can observe the following:
Two strings, `str1` and `str2`, are created. The `System.getProperty` method retrieves the system property named `user.home`, which usually represents the user's home directory. This value is stored in `str1`. The `System.getenv` method retrieves the value of the environment variable named `USER`, which provides information about the environment in which the application is running. This value is stored in `str2`.

The above code is responsible for throwing an error if `str1` is either null, empty, or is not equal to ‘`Russia`’. Similarly, an error will be thrown if `str2` is either null, empty, or is not equal to the value that is represented by `2131558400`.
The code for the `str2` check is seen below.
```shell
getResources().getString(2131558400)
```
> [!tip]
APKs include an Android Resource Table (`resources.arsc`) file, which contains a compiled list of resources used by the application. When we used `apktool`, it created a readable version of this resource file. This is where we can examine the strings used in the application.
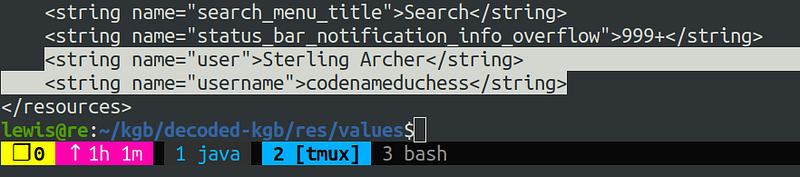
Let's have a look at the strings. We have to first navigate to the directory containing the decoded APK contents, then to the `res` directory, and finally into `values`.

And there you have it — right at the pinnacle, a string labeled “`User`” awaits, obviously encoded in base64. Decoding this unveils our first flag.
> [!done] Flag #1
> FLAG{57ERL1ING_4RCH3R}
We’ve secured a flag but still, the annoying box persists when we launch the application. As a quick reminder, the `onCreate` method was responsible for executing all of the string comparison checks, and `onCreate` is nested within the `MainActivity`. The next logical progression leads us to examine the Smali code for `MainActivity`.
The Smali code can be seen on the left, along with the corresponding Java on the right. It may be difficult to read but don't worry about that right now.

To begin with, let’s pinpoint the location of the checks so that we can eliminate them altogether. Admittedly, reading Smali code isn’t my forte, and this file turned into a personal Frankenstein project of mine.
We're looking for the following code, but in Smali.
The highlighted line in the image below shows where this code starts in the Smali representation.

Since we’re on a mission to completely bypass the integrity checks, the straightforward approach is to locate where `user.home` is loaded into `v0`. Then, in theory, we can remove all the code between this point and where the user interface stuff continues.
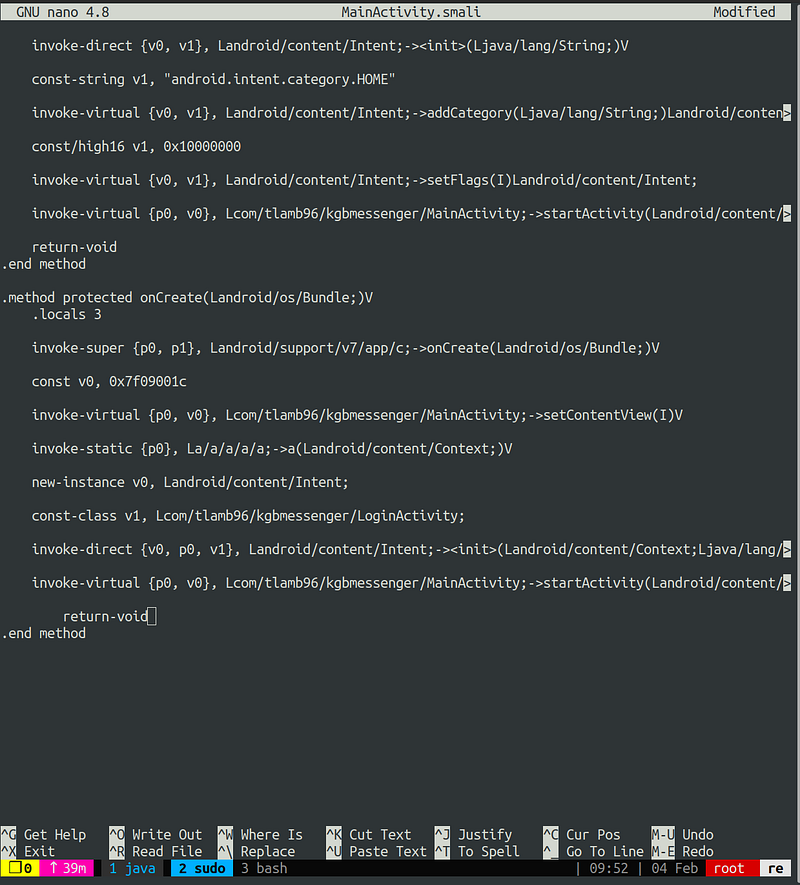
The final code after a Smali makeover should look like the following.
Now, reconstruct the APK using `apktool` with the `b` flag for build.
```shell
apktool b decoded-kgb/ -o bypass-checks-kgb.apk
```
With the modified APK in hand, the next step is to push it to the Android device for testing. Begin by removing the original APK to pave the way for the updated version.
```shell
adb shell pm list packages | grep messenger # get the full package name of the app
adb uninstall com.tlamb96.spetsnazmessenger
```
Then, install the modified version.
```shell
adb install bypass-checks-kgb.apk
```
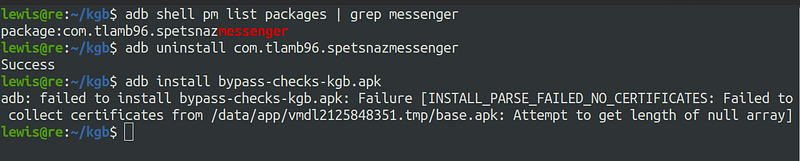
Ah, it appears that I forgot something — signing the APK. Android mandates that all APKs be digitally signed with a certificate prior to installation or updates. We can easily sign our APK by downloading `uber-apk-signer`. You can download it [here](https://github.com/patrickfav/uber-apk-signer).
> [!info]
`Uber-apk-signer` is a tool that helps to sign, zip aligning and verifying multiple Android application packages (APKs) with either debug or provided release certificates (or multiple).
Proceed to sign the APK.
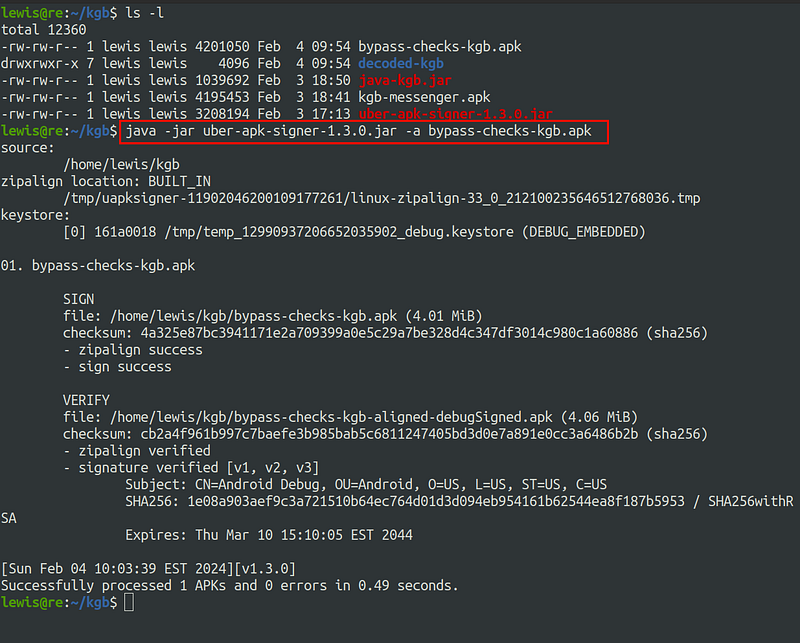
Now, retry the installation.
```shell
adb install bypass-checks-kgb-aligned-debugSigned.apk
```
The moment of truth…
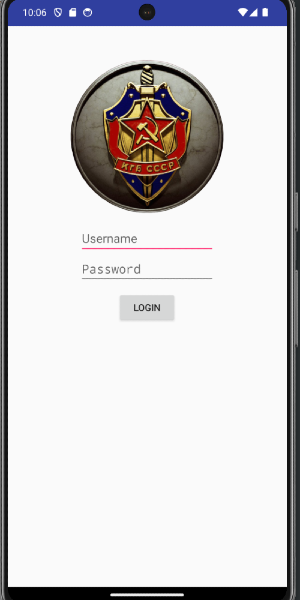
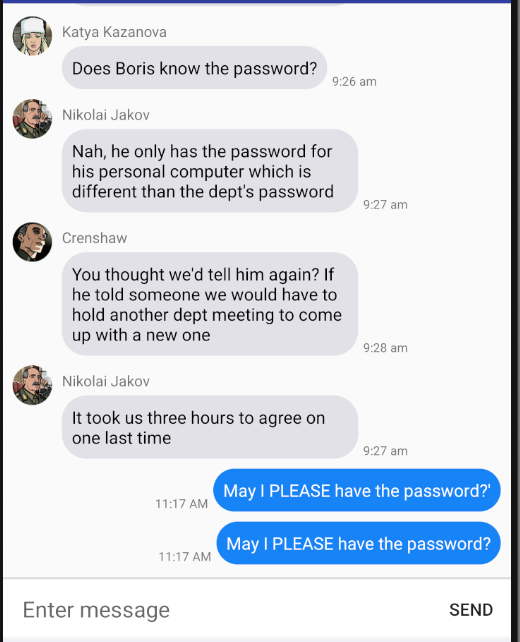
Bingo, but what now? Since it’s evident that is a login process, we can turn our attention to the the `LoginActivity` class.
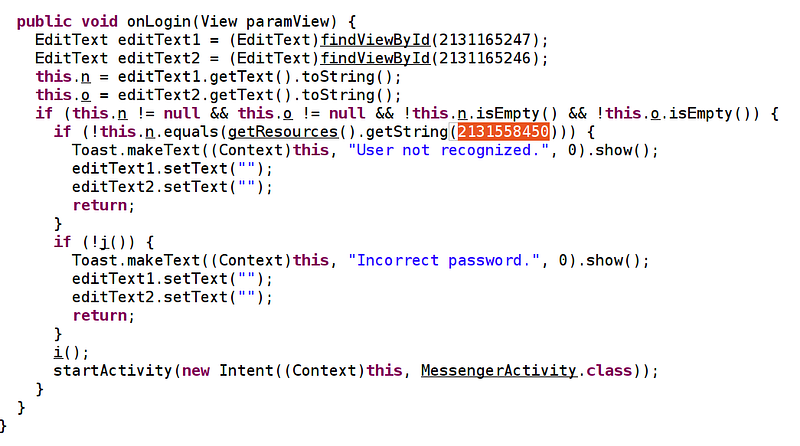
Just as with the initial integrity checks, it seems we have another check tied to the username, triggering a “`User not recognised.`” message if it doesn’t match the string represented by `2131558450`. I took the lazy route by inspecting the decoded strings in `strings.xml` — but hey, it is a CTF after all.
This appears to be a username, but the password? After a meticulous and somewhat sluggish exploration of the files, I opted for a sanity check via Google.

This Wiki tells us the following.
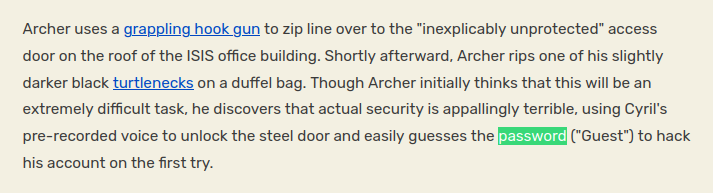
These credentials work and we are one step closer to the final flag.

> [!done] Flag #2
> FLAG{G00G13_PR0}
Looking at the `MessengerActivity` class, as this is what activity runs next, we see some variables of interest.
- String `p` which = `“V@]EAASB\022WZF\022e,a$7(&am2(3.\003”`
- String `r` which = `“\000dslp}oQ\000 dks$|M\000h +AYQg\000P*!M$gQ\000”`

If we continue reading the code, there are two methods, `a` and `b` which both return string values. A brief look at the code tells us that these methods are responsible for obfuscation.
Further on down, `onSendMessage` is called whenever we send a message.
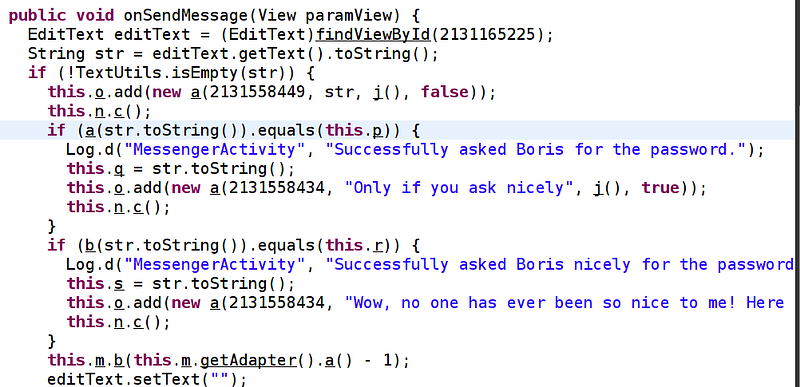
This method appears to be doing a comparison between the two obfuscated strings, and two new strings `a` and `b.` Using Frida, we can confirm that `a` and `b` store the messages that we send respectively.
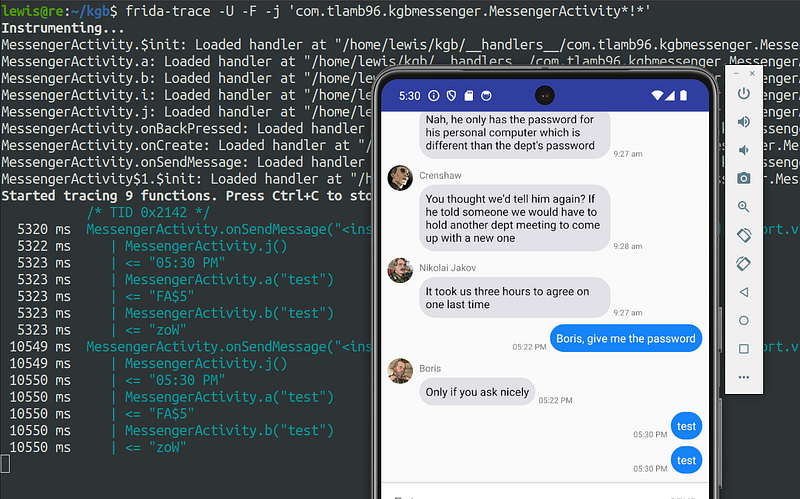
The image above demonstrates that when the `j` method is called, the input provided in the app is stored in either `a` or `b`, and then an XOR operation is performed to obfuscate and compare the input with the obfuscated strings we saw earlier.
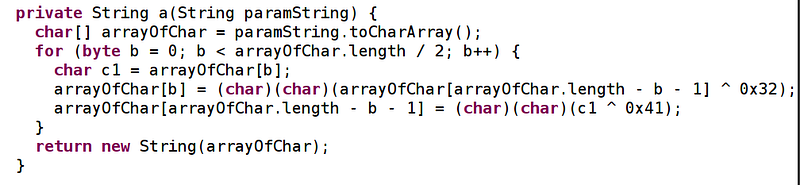
Here's a breakdown of the `a` method:
1. **Input Handling:** The method takes a string as input.
2. **Conversion to Character Array:** The string is converted into a character array, `arrayOfChar`.
3. **Loop Initialisation:** A loop is initiated with an index variable `b` starting at 0. The loop continues while `b` is less than half the length of the array, incrementing `b` by 1 with each iteration.
4. **Character Modification:** Within the loop:
- `c1` is initialized as the character at index `b` of the `arrayOfChar` array.
- The character at index `b` is modified using the XOR operation:
```shell
arrayOfChar[b] = (char)(arrayOfChar[arrayOfChar.length - b - 1] ^ 0x32)
```
5. **Explanation of the Modification:**
- The character at index `b` is updated based on the character at the corresponding position from the end of the array, after applying the XOR operation with `0x32`.
- `b` starts at `0` and iterates up to the midpoint of the array. The expression `arrayOfChar.length - b - 1` calculates the position from the end of the array to perform the XOR operation.
- If this isn’t clear, consider that the modification effectively mirrors and obfuscates the characters by comparing positions from both ends of the array.
6. `^ 0x32` performs an `XOR` operation with the hex value 0x32 — this is the obfuscation.
```shell
arrayOfChar[arrayOfChar.length - b - 1] = (char)(char)(c1 ^ 0x41);
```
7. Similarly, the next line of code performs a further `XOR` operation on the character in`c1` with the hex value 0x41.
Now that we know how the obfuscation is performed, we can write code to reverse it. I’m writing in C because I’m most comfortable with it but feel free to choose your own poison.
Because the characters get `XOR`’d with 0x32 first and then 0x41, we just need to write a function that does the same thing but in the opposite direction.
```C
void reverse(char* obfuscatedString)
{
int length = strlen(obfuscatedString);
for (int index = 0; index < length / 2; index++)
{
char c1 = obfuscatedString[index];
obfuscatedString[index] = obfuscatedString[length - index - 1] ^ 0x41;
obfuscatedString[length - index - 1] = c1 ^ 0x32;
}
}
```
We just need a main function now to hold the obfuscated string and also to perform the reversing function.
```c
int main() {
char obfuscatedString[] = "V@]EAASB\022WZF\022e,a$7(&am2(3.\003";
printf("Before reversing: %s\n", obfuscatedString);
// Reverse the obfuscation
reverse(obfuscatedString);
printf("After reversing: %s\n", obfuscatedString);
return 0;
}
```
We can now compile and run this code.
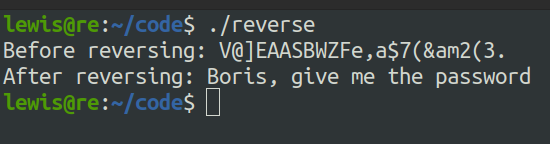
Let’s try sending this as a message in the app.

Boris is playing hard to get. No worries — continue reversing.
The obfuscation method for `b` looks a little weird in `JD-GUI`. We can assume that there has been issues when de-compiling.
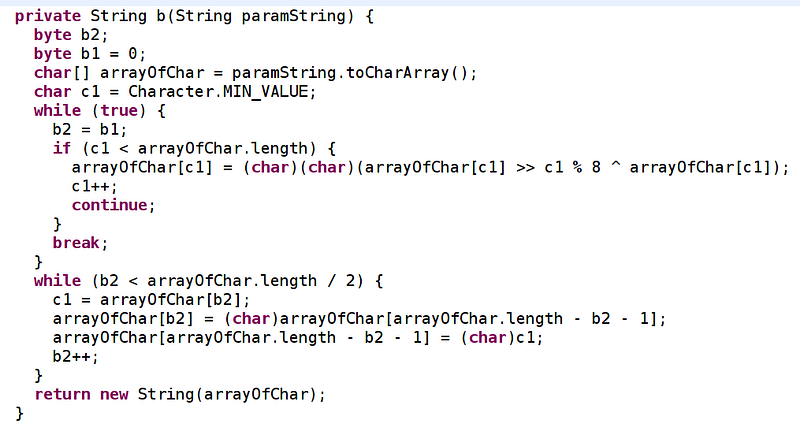
It looks better in JADX-GUI.

Generally, the `b`method does the following:
1. Takes user input, converts it to a character array
2. Iterate through the array till half-way through
3. Right shift the character by `i % 8` — the remainder when we divide `i` by `8`
4. `XOR` the result by the original character (`i`)
5. Then, the current iteration which is stored in a new variable `i2` is equal to the last character of the array (it’s reversing the array)
I had a nightmare with this. After a lot of suffering, I concluded that brute forcing is easiest.
Because the obfuscation right shifts, `XORs`, then reverses the string, we will reverse the string first.
```
def reverse_string(inputString):
return inputString[::-1]
# converted the null terminators to Python syntax for this step
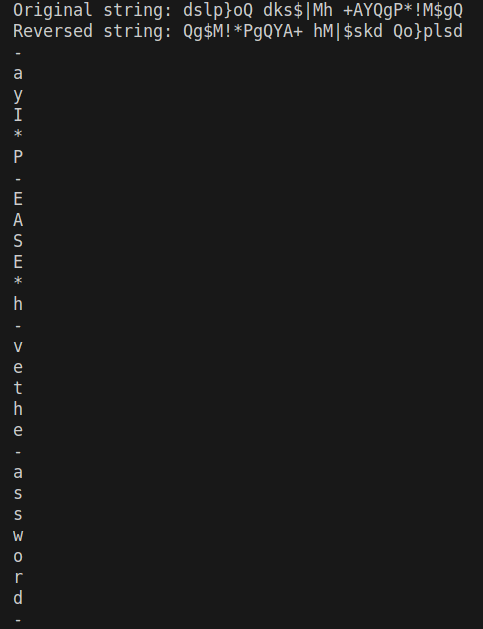
inputString = "\x00dslp}oQ\x00 dks$|M\x00h +AYQg\x00P*!M$gQ\x00"
reversedString = reverse_string(inputString)
print("Original string:", inputString)
print("Reversed string:", reversedString)
```
Running the code gives us the reversed version.

Now we need to write code to brute force. We need it to do the following steps:
1. XOR each character
2. Right shift each character
```python
import string
# Reverse the string
def reverse_string(inputString):
return inputString[::-1]
inputString = "\x00dslp}oQ\x00 dks$|M\x00h +AYQg\x00P*!M$gQ\x00"
reversedString = reverse_string(inputString)
print("Original string:", inputString)
print("Reversed string:", reversedString)
# Define a function to perform brute-force decryption
def bruteforce(index, obf):
# Print * if we can't crack a character
if index % 8 == 0:
print("*")
return
# Iterate over the alphabet
for letter in string.ascii_letters:
# XOR and right shift on the character
decrypted_letter = chr((ord(letter) >> (index % 8)) ^ ord(letter))
if decrypted_letter == obf:
# If matches, print the potential letter
print(letter)
return
# Iterate over each character in the reversed obfuscated string
for index in range(len(reversedString)):
# Call the bruteforce function to attempt it for each character
bruteforce(index, reversedString[index])
```
When we run our code, we get something resembling a string — just do some tidying up to get `*ayIP*EASEh*vethe*assword*`. It’s safe to assume that this is ‘*May I PLEASE have the password?*’.
Interesting, must be missing punctuation? We can define an alphabet in our code that includes punctuation as we just had a-z & A-Z before.
```python
import string
# Reverse the string
def reverse_string(inputString):
return inputString[::-1]
inputString = "\x00dslp}oQ\x00 dks$|M\x00h +AYQg\x00P*!M$gQ\x00"
reversedString = reverse_string(inputString)
print("Original string:", inputString)
print("Reversed string:", reversedString)
def bruteforce(index, obf):
alphabet = string.ascii_letters + string.punctuation
if index % 8 == 0:
print("*")
return
for letter in alphabet:
if chr((ord(letter) >> (index % 8)) ^ ord(letter)) == obf:
print(letter)
for index in range(len(reversedString)):
bruteforce(index, reversedString[index])
```
> [!warning]
> Using an asterisk (\*) as a placeholder wasn't a smart idea. I recommend changing this to a dash or something.
This new code outputs the following:
That’s better. Try this in the app now.
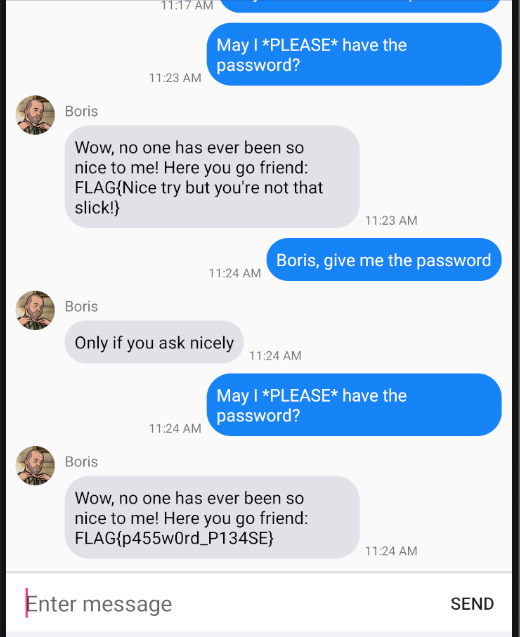
Finally. I forgot that there was code to make sure that both messages are sent consecutively and because I got the flags on different days I just had to send them both again.
> [!done] Flag #3
> FLAG{p455w0rd_P134SE}
### Conclusion
Thanks for reading, peace.